| ❌ | ❌ | ❌ | ❌ | ❌ | ✅ |
|---|
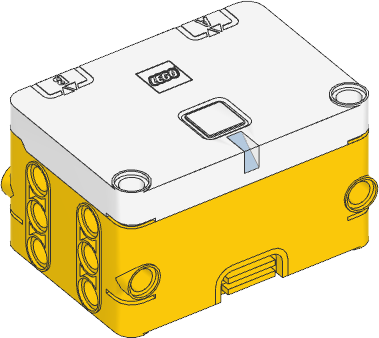
Essential Hub
- class EssentialHub(top_side=Axis.Z, front_side=Axis.X, broadcast_channel=None, observe_channels=[])
LEGO® SPIKE Essential Hub.
Initializes the hub. Optionally, specify how the hub is placed in your design by saying in which direction the top side (with the button) and the front side (with the USB port, and I/O ports A and B) are pointing.
- Parameters:
top_side (Axis) – The axis that passes through the top side of the hub.
front_side (Axis) – The axis that passes through the front side of the hub.
broadcast_channel – Channel number (0 to 255) used to broadcast data. Choose
Nonewhen not using broadcasting.observe_channels – A list of channels to listen to when
hub.ble.observe()is called. Listening to more channels requires more memory. Default is an empty list (no channels).
Using the hub status light
- light.on(color)
Turns on the light at the specified color.
- Parameters:
color (Color) – Color of the light.
- light.off()
Turns off the light.
- light.blink(color, durations)
Blinks the light at a given color by turning it on and off for given durations.
The light keeps blinking indefinitely while the rest of your program keeps running.
This method provides a simple way to make basic but useful patterns. For more generic and multi-color patterns, use
animate()instead.
- light.animate(colors, interval)
Animates the light with a sequence of colors, shown one by one for the given interval.
The animation runs in the background while the rest of your program keeps running. When the animation completes, it repeats.
Using the button
- buttons.pressed() Set[Button]
Checks which buttons are currently pressed.
- Returns:
Set of pressed buttons.
- system.set_stop_button(button)
Sets the button or button combination that stops a running script.
Normally, the center button is used to stop a running script. You can change or disable this behavior in order to use the button for other purposes.
- Parameters:
button (Button) – A button such as
Button.CENTER, or a tuple of multiple buttons. ChooseNoneto disable the stop button altogether. If you do, you can still turn the hub off by holding the center button for three seconds.
Using the IMU
- imu.ready() bool
Checks if the device is calibrated and ready for use.
This becomes
Truewhen the robot has been sitting stationary for a few seconds, which allows the device to re-calibrate. It isFalseif the hub has just been started, or if it hasn’t had a chance to calibrate for more than 10 minutes.- Returns:
Trueif it is ready for use,Falseif not.
- imu.stationary() bool
Checks if the device is currently stationary (not moving).
- Returns:
Trueif stationary for at least a second,Falseif it is moving.
- imu.up(calibrated=True) Side
Checks which side of the hub currently faces upward.
- Parameters:
calibrated (bool) – Choose
Trueto use calibrated gyroscope and accelerometer data to determine which way is up. ChooseFalseto use raw acceleration values.- Returns:
Side.TOP,Side.BOTTOM,Side.LEFT,Side.RIGHT,Side.FRONTorSide.BACK.
- imu.tilt(calibrated=True) Tuple[int, int]
Gets the pitch and roll angles. This is relative to the user-specified neutral orientation.
The order of rotation is pitch-then-roll. This is equivalent to a positive rotation along the robot y-axis and then a positive rotation along the x-axis.
- Parameters:
calibrated (bool) – Choose
Trueto use calibrated gyroscope and accelerometer data to determine the tilt. ChooseFalseto use raw acceleration values.- Returns:
Tuple of pitch and roll angles in degrees.
- imu.acceleration(axis, calibrated=True) float: mm/s²
- imu.acceleration(calibrated=True) vector: mm/s²
Gets the acceleration of the device along a given axis in the robot reference frame.
- Parameters:
- Returns:
Acceleration along the specified axis. If you specify no axis, this returns a vector of accelerations along all axes.
- imu.angular_velocity(axis, calibrated=True) float: deg/s
- imu.angular_velocity(calibrated=True) vector: deg/s
Gets the angular velocity of the device along a given axis in the robot reference frame.
- Parameters:
- Returns:
Angular velocity along the specified axis. If you specify no axis, this returns a vector of accelerations along all axes.
- imu.heading() float: deg
Gets the heading angle of your robot. A positive value means a clockwise turn.
The heading is 0 when your program starts. The value continues to grow even as the robot turns more than 180 degrees. It does not wrap around to -180 like it does in some apps.
Note
For now, this method only keeps track of the heading while the robot is on a flat surface.
This means that the value is no longer correct if you lift it from the table or turn on a ramp. Try
hub.imu.heading('3D')for a heading value that compensates for this. This will become the default in a future release. If you try it, please let us know on our forums!- Returns:
Heading angle relative to starting orientation.
- imu.reset_heading(angle)
Resets the accumulated heading angle of the robot.
This cannot be called while a drive base is using the gyro to drive or hold position. Use
DriveBase.reset()instead, which will stop the robot and then set the new heading value.- Parameters:
angle (Number, deg) – Value to which the heading should be reset.
- Raises:
OSError – There is a drive base that is currently using the gyro.
- imu.rotation(axis, calibrated=True) float: deg
Gets the rotation of the device along a given axis in the robot reference frame.
This value is useful if your robot only rotates along the requested axis. For general three-dimensional motion, use the
orientation()method instead.
- imu.orientation() Matrix
Gets the three-dimensional orientation of the robot in the robot reference frame.
It returns a rotation matrix whose columns represent the
X,Y, andZaxis of the robot.- Returns:
The 3x3 rotation matrix.
- imu.settings(*, angular_velocity_threshold, acceleration_threshold, heading_correction, angular_velocity_bias, angular_velocity_scale, acceleration_correction)
- imu.settings() Tuple
Configures the IMU settings. If no arguments are given, this returns the current values. Use keyword arguments for each value to ensure correct behavior because settings may be added or changed in future releases.
These IMU settings are saved on the hub. They will keep their values until you change them again. The values will be reset to default values if you update the hub to a different firmware version or call the
hub.system.reset_storagemethod.The
angular_velocity_thresholdandacceleration_thresholddefine when the hub is considered stationary. If all measurements stay below these thresholds for one second, the IMU will recalibrate itself. In a noisy room with high ambient vibrations (such as a competition hall), you can increase the thresholds slightly to give your robot the chance to calibrate. To verify that your settings are working as expected, test that thestationary()method givesFalseif your robot is moving, andTrueif it is sitting still.The gyroscope measures how fast the hub rotates to estimate the total angle. Due to variations in the production process, each hub consistently reports a different value for a full rotation. For example, your hub might consistently report 357 degrees for every 360 degree turn. You can measure this value with
hub.imu.rotation(-Axis.Z)and enter it as theheading_correctionsetting. Then, thehub.imu.heading()method will take it into account going forward, correctly scaling it to 360 degrees for a full rotation.- Parameters:
angular_velocity_threshold (Number, deg/s) – The threshold for variations in the angular velocity below which the hub is considered stationary enough to calibrate. After a reset the value is 2 deg/s.
acceleration_threshold (Number, mm/s²) – The threshold for variations in acceleration below which the hub is considered stationary enough to calibrate. After a reset the value is 2500 mm/s².
heading_correction (Number, deg) – Number of degrees reported by
imu.rotation(-Axis.Z)for one full rotation of your robot. After a reset the value is 360 degrees.angular_velocity_bias (tuple, deg/s) – Initial bias for angular velocity measurements along x, y, and z immediately after boot. After a reset the value is (0, 0, 0) deg/s.
angular_velocity_scale (tuple, deg) – Scale adjustment for x, y, and z rotation to account for manufacturing differences. After a reset the value is (360, 360, 360) deg/s. The correct values can be obtained using hub.imu.rotation(Axis.X, calibrated=False) and repeating it for each axis.
acceleration_correction (tuple, mm/s²) – Scale adjustment for x, y, and z gravity magnitude in both directions to account for manufacturing differences. After a reset the value is (9806.65, -9806.65, 9806.65, -9806.65, 9806.65, -9806.65) mm/s². The correct values can be obtained using hub.imu.acceleration(Axis.X, calibrated=False) and repeating it for all axes in both directions.
Using connectionless Bluetooth messaging
- awaitble.broadcast(data)
Starts broadcasting the given data on the
broadcast_channelyou selected when initializing the hub.Data may be of type
int,float,str,bytes,True, orFalse. It can also be a list or tuple of these.Choose
Noneto stop broadcasting. This helps improve performance when you don’t need the broadcast feature, especially when observing at the same time.The total data size is quite limited (26 bytes).
TrueandFalsetake 1 byte each.floattakes 5 bytes.inttakes 2 to 5 bytes depending on how big the number is.strandbytestake the number of bytes in the object plus one extra byte.When multitasking, only one task can broadcast at a time. To broadcast information from multiple tasks (or block stacks), you could use a dedicated separate task that broadcast new values when one or more variables change.
- Parameters:
data – The value or values to be broadcast.
- ble.observe(channel) bool | int | float | str | bytes | tuple | None
Retrieves the last observed data for a given channel.
Receiving data is more reliable when the hub is not connected to a computer or other devices at the same time.
- Parameters:
channel (int) – The channel to observe (0 to 255).
- Returns:
The received data in the same format as it was sent, or
Noneif no recent data is available.
- ble.signal_strength(channel) int: dBm
Gets the average signal strength in dBm for the given channel.
This indicates how near the broadcasting device is. Nearby devices may have a signal strength around -40 dBm, while far away devices might have a signal strength around -70 dBm.
- Parameters:
channel (int) – The channel number (0 to 255).
- Returns:
The signal strength or
-128if there is no recent observed data.
Using the battery
- battery.voltage() int: mV
Gets the voltage of the battery.
- Returns:
Battery voltage.
- battery.current() int: mA
Gets the current supplied by the battery.
- Returns:
Battery current.
Getting the charger status
- charger.connected() bool
Checks whether a charger is connected via USB.
- Returns:
Trueif a charger is connected,Falseif not.
- charger.current() int: mA
Gets the charging current.
- Returns:
Charging current.
- charger.status() int
Gets the status of the battery charger, represented by one of the following values. This corresponds to the battery light indicator right next to the USB port.
Not charging (light is off).
Charging (light is red).
Charging is complete (light is green).
There is a problem with the charger (light is yellow).
- Returns:
Status value.
System control
- system.info() dict
Gets information about the hub as a dictionary with the following keys:
"name": The hub name. This is the name you see when connecting via Bluetooth."reset_reason": Why the hub (re)booted. It is0if the hub was previously powered off normally. It is1if the hub rebooted automatically, like after a firmware update. It is2if the hub previously crashed due to a watchdog timeout, which indicates a firmware issue."host_connected_ble": Whether the hub is connected to a computer, tablet, or phone via Bluetooth."program_start_type": It is1if the program started automatically when the hub was powered on. It is2if the program was started with the hub buttons. It is3if the program was started from your connected computer.
- Returns:
A dictionary with system info.
- system.storage(offset, write=)
- system.storage(offset, read=) bytes
Reads or writes binary data to persistent storage.
This lets you store data that can be used the next time you run the program.
The data will be saved to flash memory when you turn the hub off normally. It will not be saved if the batteries are removed while the hub is still running.
Once saved, the data will remain available even after you remove the batteries.
- Parameters:
- Returns:
The bytes read if reading, otherwise
None.- Raises:
ValueError – If you try to read or write data outside of the allowed range.
You can store up to 512 bytes of data on this hub. The data is cleared when you update the Pybricks firmware.
- system.reset_storage()
Resets all user settings to default values and erases user programs.
- system.shutdown()
Stops your program and shuts the hub down.
Status light examples
Turning the light on and off
from pybricks.hubs import EssentialHub
from pybricks.parameters import Color
from pybricks.tools import wait

# Initialize the hub.
hub = EssentialHub()

# Turn the light on and off 5 times.
for i in range(5):

    hub.light.on(Color.RED)
    wait(1000)

    hub.light.off()
    wait(500)
Changing brightness and using custom colors
from pybricks.hubs import EssentialHub
from pybricks.parameters import Color
from pybricks.tools import wait

# Initialize the hub.
hub = EssentialHub()

# Show the color at 30% brightness.
hub.light.on(Color.RED * 0.3)

wait(2000)

# Use your own custom color.
hub.light.on(Color(h=30, s=100, v=50))

wait(2000)

# Go through all the colors.
for hue in range(360):
    hub.light.on(Color(hue))
    wait(10)
Making the light blink
from pybricks.hubs import EssentialHub
from pybricks.parameters import Color
from pybricks.tools import wait

# Initialize the hub
hub = EssentialHub()

# Keep blinking red on and off.
hub.light.blink(Color.RED, [500, 500])

wait(10000)

# Keep blinking green slowly and then quickly.
hub.light.blink(Color.GREEN, [500, 500, 50, 900])

wait(10000)
Creating light animations
from pybricks.hubs import EssentialHub
from pybricks.parameters import Color
from pybricks.tools import wait
from umath import sin, pi

# Initialize the hub.
hub = EssentialHub()

# Make an animation with multiple colors.
hub.light.animate([Color.RED, Color.GREEN, Color.NONE], interval=500)

wait(10000)

# Make the color RED grow faint and bright using a sine pattern.
hub.light.animate([Color.RED * (0.5 * sin(i / 15 * pi) + 0.5) for i in range(30)], 40)

wait(10000)

# Cycle through a rainbow of colors.
hub.light.animate([Color(h=i * 8) for i in range(45)], interval=40)

wait(10000)
IMU examples
Testing which way is up
from pybricks.hubs import EssentialHub
from pybricks.parameters import Color, Side
from pybricks.tools import wait

# Initialize the hub.
hub = EssentialHub()

# Define colors for each side in a dictionary.
SIDE_COLORS = {
    Side.TOP: Color.RED,
    Side.BOTTOM: Color.BLUE,
    Side.LEFT: Color.GREEN,
    Side.RIGHT: Color.YELLOW,
    Side.FRONT: Color.MAGENTA,
    Side.BACK: Color.BLACK,
}

# Keep updating the color based on detected up side.
while True:

    # Check which side of the hub is up.
    up_side = hub.imu.up()

    # Change the color based on the side.
    hub.light.on(SIDE_COLORS[up_side])

    # Also print the result.
    print(up_side)
    wait(50)
Reading the tilt value
from pybricks.hubs import EssentialHub
from pybricks.tools import wait

# Initialize the hub.
hub = EssentialHub()

while True:
    # Read the tilt values.
    pitch, roll = hub.imu.tilt()

    # Print the result.
    print(pitch, roll)
    wait(200)
Using a custom hub orientation
from pybricks.hubs import EssentialHub
from pybricks.tools import wait
from pybricks.parameters import Axis

# Initialize the hub. In this case, specify that the hub is mounted with the
# top side facing forward and the front side facing to the right.
# For example, this is how the hub is mounted in BLAST in the 51515 set.
hub = EssentialHub(top_side=Axis.X, front_side=-Axis.Y)

while True:
    # Read the tilt values. Now, the values are 0 when BLAST stands upright.
    # Leaning forward gives positive pitch. Leaning right gives positive roll.
    pitch, roll = hub.imu.tilt()

    # Print the result.
    print(pitch, roll)
    wait(200)
Reading acceleration and angular velocity vectors
from pybricks.hubs import EssentialHub
from pybricks.tools import wait

# Initialize the hub.
hub = EssentialHub()

# Get the acceleration vector in g's.
print(hub.imu.acceleration() / 9810)

# Get the angular velocity vector.
print(hub.imu.angular_velocity())

# Wait so we can see what we printed
wait(5000)
Reading acceleration and angular velocity on one axis
from pybricks.hubs import EssentialHub
from pybricks.tools import wait
from pybricks.parameters import Axis

# Initialize the hub.
hub = EssentialHub()

# Get the acceleration or angular_velocity along a single axis.
# If you need only one value, this is more memory efficient.
while True:

    # Read the forward acceleration.
    forward_acceleration = hub.imu.acceleration(Axis.X)

    # Read the yaw rate.
    yaw_rate = hub.imu.angular_velocity(Axis.Z)

    # Print the yaw rate.
    print(yaw_rate)
    wait(100)
Bluetooth examples
Broadcasting data to other hubs
from pybricks.hubs import EssentialHub
from pybricks.pupdevices import Motor
from pybricks.parameters import Port
from pybricks.tools import wait

# Initialize the hub.
hub = EssentialHub(broadcast_channel=1)

# Initialize the motors.
left_motor = Motor(Port.A)
right_motor = Motor(Port.B)

while True:
    # Read the motor angles to be sent to the other hub.
    left_angle = left_motor.angle()
    right_angle = right_motor.angle()

    # Set the broadcast data and start broadcasting if not already doing so.
    data = (left_angle, right_angle)
    hub.ble.broadcast(data)

    # Broadcasts are only sent every 100 milliseconds, so there is no reason
    # to call the broadcast() method more often than that.
    wait(100)
Observing data from other hubs
from pybricks.hubs import EssentialHub
from pybricks.pupdevices import Motor
from pybricks.parameters import Color, Port
from pybricks.tools import wait

# Initialize the hub.
hub = EssentialHub(observe_channels=[1])

# Initialize the motors.
left_motor = Motor(Port.A)
right_motor = Motor(Port.B)

while True:
    # Receive broadcast from the other hub.

    data = hub.ble.observe(1)

    if data is None:
        # No data has been received in the last 1 second.
        hub.light.on(Color.RED)
    else:
        # Data was received and is less that one second old.
        hub.light.on(Color.GREEN)

        # *data* contains the same values in the same order
        # that were passed to hub.ble.broadcast() on the
        # other hub.
        left_angle, right_angle = data

        # Make the motors on this hub mirror the position of the
        # motors on the other hub.
        left_motor.track_target(left_angle)
        right_motor.track_target(right_angle)

    # Broadcasts are only sent every 100 milliseconds, so there is
    # no reason to call the observe() method more often than that.
    wait(100)
System examples
Turning the hub off
from pybricks.hubs import EssentialHub
from pybricks.tools import wait

# Initialize the hub.
hub = EssentialHub()

# Say goodbye and give some time to send it.
print("Goodbye!")
wait(100)

# Shut the hub down.
hub.system.shutdown()